A Guide to Data Layers
Introduction
Data layers can be one of the more confounding elements of website analytics tracking. There’s plenty of background information to understand before you can confidently make proper use of them.
Our guide will give you everything you need to understand data layers, and the role they play in your analytics tracking.
It’s the perfect starting point for utilising data layers in your tag management system and analytics tools.
Table of Contents
Introduction
What is a data layer?
What are the benefits of a data layer?
What does a data layer look like?
Data layers for tag management
How to use a data layer in Google Tag Manager
- Add data layer code to your web page
- Add information to the data layer
- Set up your data layer variable
- Configure tags with data layer variables
- Set up trigger events
- Preview and debug
Use DataTrue to secure your data layer
What is a data layer?
A data layer is a JavaScript universal data object used to collect, store and pass data on a website in a standardised way.
Data layers are useful as a master resource of the data on your site. Rather than connecting all your tools to various data sources on your site, you can connect them all to your data layer structure.
This ensures that your tools are drawing from the same source and are using the same information. As your analytics tech stack grows, the correct setup of your data layer becomes imperative to ensure you are leveraging your analytics for growth.
.
Website layers explained
To break down the function and purpose of a data layer, it’s helpful to look at the other layers of a website. Virtually every website has the 2 following layers:
- Front-end: Your site’s front-end is also known as the presentation layer or the client side. This refers to everything users see and can interact with when they click on your site. Forms, buttons, animations and menus all factor into your front-end. Your front end is usually created using HTML and CSS.
- Back-end: This layer is also known as the application layer or the server side. It focuses on the functionality of your website and connects with tools like your tag management systems.
A third layer found on many websites – though not all – is the data layer. The data layer removes the responsibility from one of the other layers to collect data and dedicates itself to that task.
While it’s possible to use one of the other layers of a site to double as the data layer, this can lead to many issues.
For instance, using the front end of your site as the data layer can cause issues when changes to the site are made. You might have your data linked to particular design features of the site, affecting your data if any of these features are changed.
Having a dedicated data layer prevents any such issues from arising, keeping your data structure uniform and simplified.
What are the benefits of a data layer?
While adding a data layer to your site can cause some headaches, there are plenty of reasons to consider doing it. Some of the key benefits of data layers are:
- Single source of data: For any website dealing with large amounts of complex data, working from one single source is essential since this allows for greater accuracy and flexibility.
- Integration between applications: Data layers facilitate the streamlined integration of any application that requires data from your site by acting as the singular source of primary data. Without a data layer, you may have to spend many hours going through individual applications and ensuring the same, correct data is being used.
- Easier quality assurance: Quality assurance is the bugbear of data analysts the world over. Having a single source of data to work with makes it much easier to check your data for any errors or holes. This allows you to move forward with your analytics strategy with confidence.
What does a data layer look like?
Here is an example of what a data layer looks like:
[{
“gtm.start”: 1720739311646,
“event”: “gtm.js”,
“gtm.uniqueEventId”: 1
}, {
“gtm.start”: 1720739311652,
“event”: “gtm.js”,
“gtm.uniqueEventId”: 3 },
{
“OnetrustActiveGroups”: “,C0001,C0002,C0004,” },
{
“OptanonActiveGroups”: “,C0001,C0002,C0004,” },
{ “event”: “OneTrustGroupsUpdated”,
“OnetrustActiveGroups”: “,C0001,C0002,C0004,”,
“gtm.uniqueEventId”: 4 },
{ “event”: “OneTrustLoaded”,
“OnetrustActiveGroups”: “,C0001,C0002,C0004,”,
“gtm.uniqueEventId”: 5},
{
“event”: “OptanonLoaded”,
“OptanonActiveGroups”: “,C0001,C0002,C0004,”,
“gtm.uniqueEventId”: 6 },
{
“event”: “gtm.dom”,
“gtm.uniqueEventId”: 7 },
{“event”: “gtm.load”,
“gtm.uniqueEventId”: 25 } ]
Datlayer code is fairly simple. One major part of data layers is key/value pairs.
Keys represent particular categories of data, while the value is the input. For instance, a streaming website might have keys for a movie’s title, genre or director.
The respective values for these keys might be “Citizen Kane”, “Drama” and “Orson Welles”.
With this information in place, all relevant applications now have the same data to draw from.
Another common feature of data layers is events. Including events in your data layer makes it much easier to set up triggers on your tags.
Events in data layer code indicate when specific actions, such as a button being pressed, should cause tags to fire.
Common events you might include in your data layer include:
- ‘pageView’
- ‘addToCart’
- ‘purchaseComplete’
- ‘formSubmit’
- ‘buttonClick’
Data layers for tag management
So, how does a data layer affect the world of tag management?
Firstly, you might find that your tag management software, such as Google Tag Manager, has automatically created a data layer on your website. If you don’t plan to use custom data on your website, this automatic layer should be fine for your purposes, and you won’t need to make any further changes.
However, for more complex data processing and analysis, you will need to add extra information to this data layer. This is primarily done through the dataLayer.push() command.
dataLayer.push({‘event’: ‘event_name’})
Once keys and values have been stored in the data layer, they can be stored in variables. Variables can then be easily used in your tag management systems.
This command is also used to add event information to your data layer, telling your tags when they should fire.
How to use a data layer in Google Tag Manager
With the basics of data layers covered, let’s take a look at the steps to implementing and using a data layer in Google Tag Manager. Once you understand this process, it will become much simpler to use a data layer to send reliable, relevant data to your various analytics tools.
Add data layer code to your web page
For maximum reliability and uniformity, it’s a good idea to enact data layer implementation on all pages. This can be achieved by adding data layer code into header files or other templates used on every page.
For the purposes of GTM, your data layer code can be as simple as the following:
<script>
window.dataLayer = window.dataLayer || [];
</script>
Add information to the data layer
The most commonly used way to add information to your data layer is with the dataLayer.push() command. First, you must decide on your keys, or categories of data.
Common examples of keys for data layers include:
- Page information, such as ‘pageType’, ‘pageTitle’ or ‘pageCategory’
- User information, such as ‘userId’, ‘userType’ or ‘userStatus’
- E-commerce transactions, such as ‘transactionId’, ‘transactionTotal’ or ‘transactionProducts’
- Geographic data, such as ‘userCountry’, ‘userRegion’, or ‘userCity’
Then, within your code, include the value of each key. For instance, the value for ‘pageType’ might be ‘homepage’.
dataLayer.push({
pageType: “homepage”,
});
This same command is also used to add custom events to the data layer. You’ll use these custom events to set up your tag triggering later in GTM.
You can even add custom event data in the same dataLayer.push() command as your keys and values to make triggering even smoother down the line.
dataLayer.push({
pageType: “homepage”,
custom: “abcdef”,
});
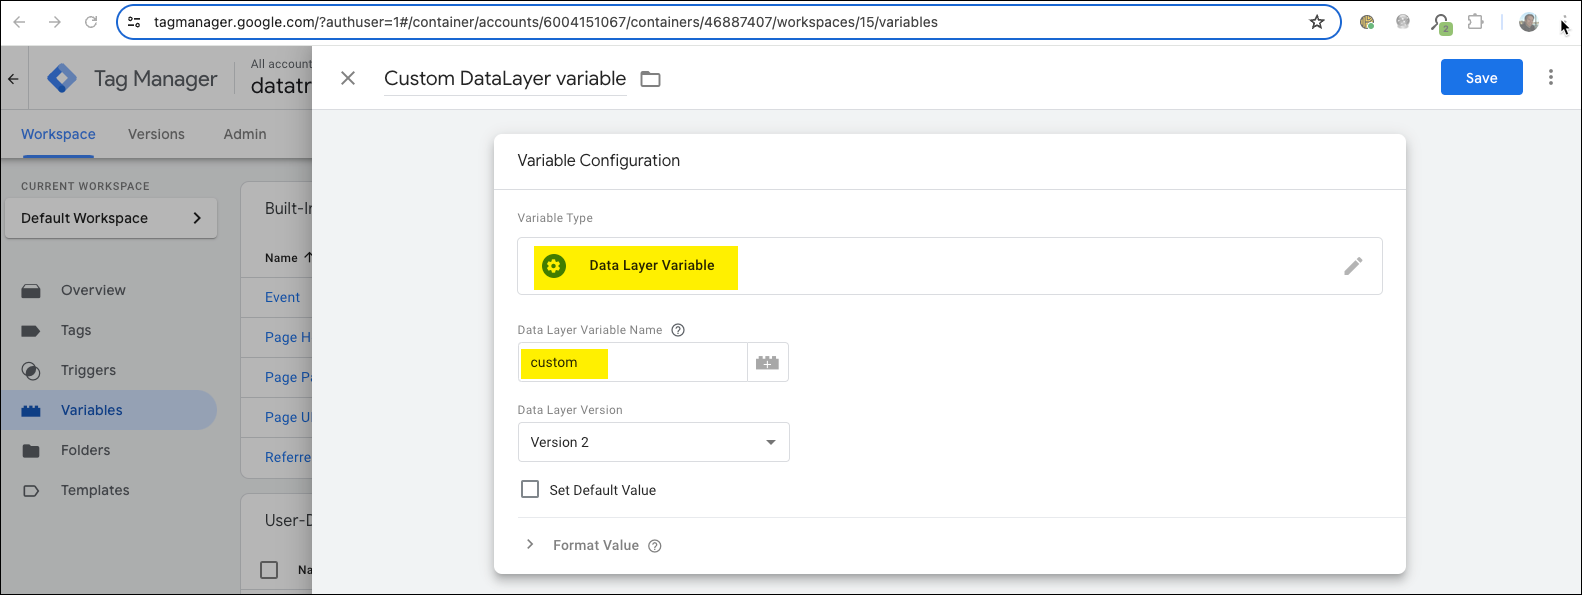
Set up your data layer variable
Once information has been added to your data layer, you need a way to organise and access this data. This is achieved through data layer variables.
Normal variables in Google Tag Manager cannot be used to store custom data added to the data layer. You need to create data layer variables to achieve this.
You can create a data layer variable with the following steps:

- Click Variables.
- Under User-Defined Variables, click New.
- Click Variable Configuration and select Data Layer Variable.
- Enter the key in the Data Layer Variable Name field. Note that the key should be copied exactly as it is written in the code.
- Set your Data Layer Version. Usually, it is best to leave this as Version 2.
- Save the variable, and repeat these steps for other data layer keys you would like to have saved as variables.
- Publish the container.
Configure tags with data layer variables
With your variables created, you can now send data to other applications using your data layer variables.
The first step is to set tags for those applications in GTM. Common applications like Google Analytics and Facebook Pixel have built-in tag templates within GTM. Alternatively, you can create a custom HTML tag for the application you want to use.
Within Tag Configuration, you can add your data layer variable in the label or value field. Once added, you should be able to reference your data layer variable in various fields by selecting it from the Variable menu.
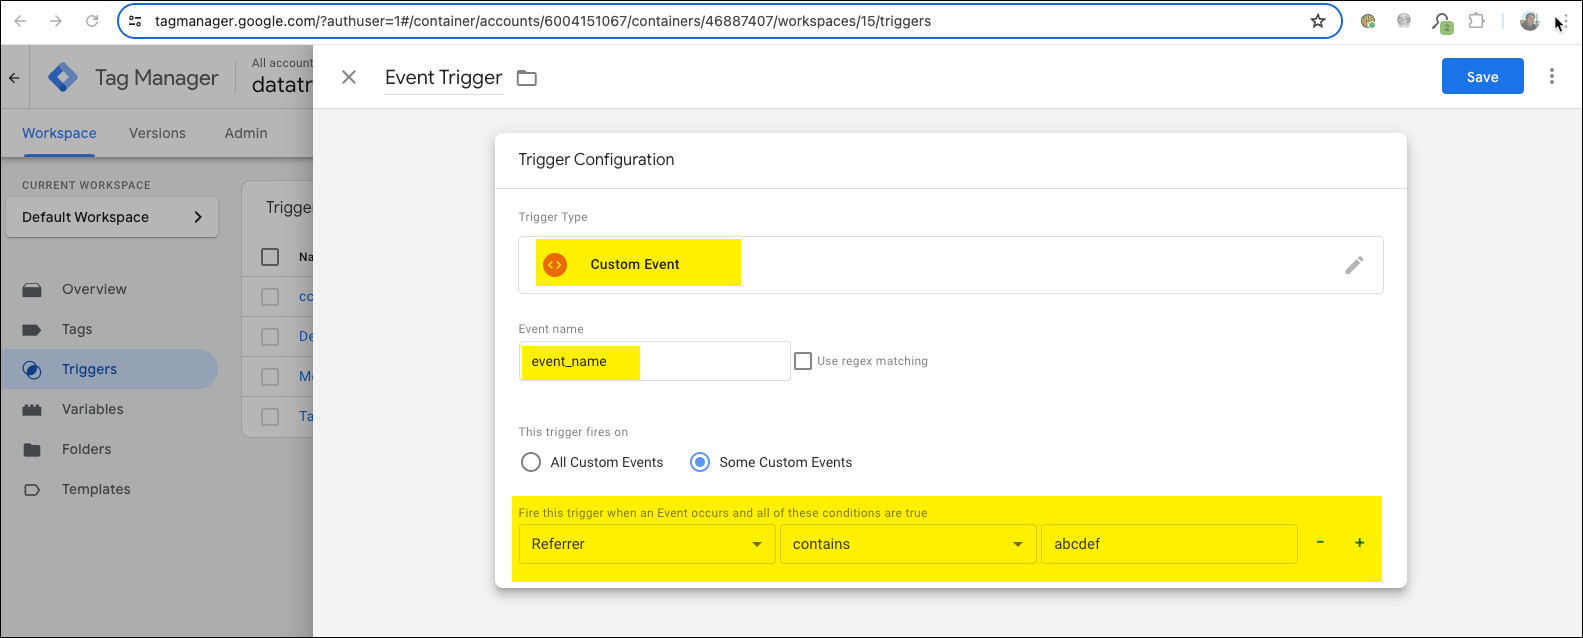
Set up trigger events
With your tags ready to go, you need to set up triggers. This determines when tags are fired, sending data to your other tools like Google Analytics.
Follow these steps to establish triggering for your data layer tags:
- Click Triggers.
- Click New.
- Select ‘Custom Event’ as the trigger type.
- Enter the event name, exactly as it appears in the dataLayer.push() command.
- Define additional conditions if necessary.
- After defining the conditions, click Save to store your trigger settings. Give your trigger a meaningful name for easy identification.
- Go to the Tags section and choose the tag you have configured.
- Click Triggering and select the trigger you’ve just created.
- Before publishing your changes, test to ensure the tag is working properly (see the following step).

Preview and debug
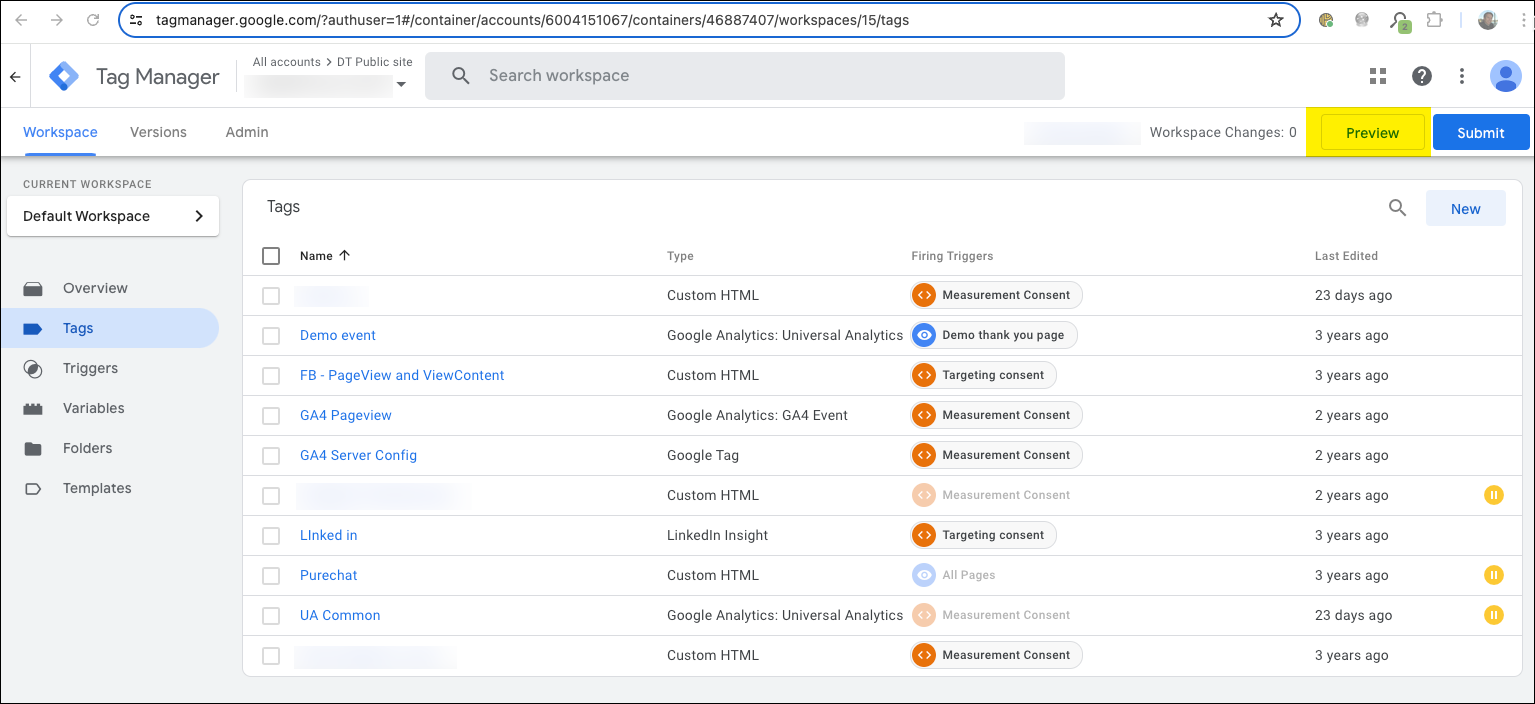
Before publishing any changes, you must carefully test the tags and triggers you have created. Thankfully, GTM’s preview and debug mode make it easy to do that.
Follow these steps to ensure your data layer tags and triggers are functioning as intended before you roll them out.
- Click Preview to activate preview and debug mode.
- In another tab, open your website.
- The GTM debug pane should now appear on your site.
- Perform actions on your site to trigger custom events.
- Identify any tags that are misfiring or not firing at all, and any variables that are not showing the correct values. Check out our guide to tag auditing for troubleshooting tips.
- Perform tests across various pages and interaction types.
- Exit preview mode and publish the changes you have made.

And with that, you have successfully used the data layer in Google Tag Manager. You now have a single source of data for various applications to draw on, and you have set up the necessary tags and triggers to disseminate your data.
You’re one step closer to being assured that your organisation has all the information it needs to thrive.
Use DataTrue to secure your data layer
Using a data layer is the best practice for data control and use in your tags. However, your heavy reliance on this single object can lead to serious issues if your data is unreliable or if the layer breaks.
This is where DataTrue’s automated data layer testing comes in. It’s easy to begin setting up validation tests and quickly uncovering any issues that are arising with regard to your data layer. This ensures the correct data is sitting in your data layer and being passed to your tags.
Automated data layer testing is just one form of web analytics testing DataTrue offers. Book a demo with DataTrue today to discover how your data layer can be secured and provide data you can count on.
